


Launching a mobile app you have been working on for months on end to an app store can be daunting, especially when you are planning to make it live on a store with 2.65 million applications. Google Play Store has been an entrepreneur’s favorite for a very long time, specifically at the back of reasons like a massive reach, greater acceptance towards innovation, and less go to market time.
Now irrespective of whether you are publishing an app on google play for the first time or third, it can be equally nerve-wracking. The intent of this article today is to help you know the nitty-gritty of how to submit an app to the google play store.
However, before you get to the stage of google play app submission, it is crucial that you prepare your application for success. So, before we get down to the process to upload an app to google play, let’s get down to the final checklist before you push your app, assuming you have looked into the mistakes to avoid while building a mobile app.
Things to do before you publish Android app
Once you build your app to the stage where it is ready to be published, there is no going back. Thus, it’s extremely important that you push out the best version of your Android app. Luckily, there are only a few things that you should confirm before hitting the publish button.
- Enroll in the Google Play app signing
- Limit yourself to the download size limit
- Guarantee the security side of your app
- Run a final check on your app’s features across devices
Also see – How much does App Maintenance Cost
How to publish an app on Google play store?
Now that we have built and quality checked an app according to the google play store guidelines, let’s get down to the step-by-step stages.
1. Create an Android Developer Account on the google play developer console
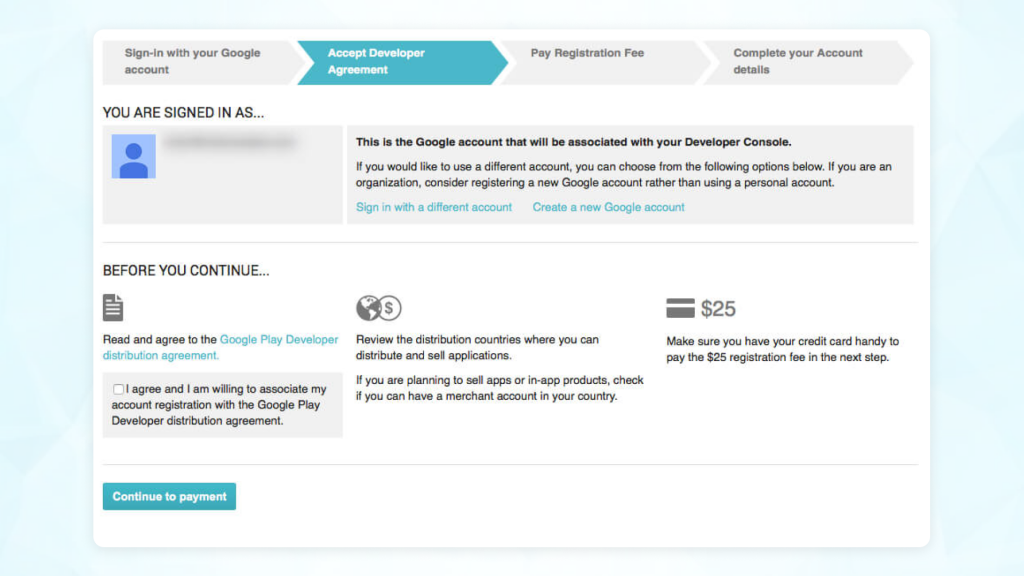
When it comes to becoming one of the most-used Google apps, the first step would be to sign up for the Google play console. The developers need to pay a one-time Google developer account cost of $25 to open an account which opens them to multiple control features and functions.
Typically, they will be asked to add in information like name, country, etc. before their account gets a green signal in under 48 hours.
2. Link the Developer Account with Google Wallet Merchant Account
If yours is an app with in-app purchases facility, you will need a merchant account. To open one, go to the Google Play Console account and then click on Reports > Financial Reports. Next, click on ‘Set up a merchant account now’ and add the details.
This will directly link the merchant account to your Google Play Console account.
3. Create the application
In this stage, you will need to create your application on the play store. The process that should be followed for this includes:
- Click Menu > All applications
- Choose ‘Create application’
- From the drop-down menu that appears, select the app’s default language
- Lastly, enter the application’s title and click on ‘Create’.
4. Fill in the listing details
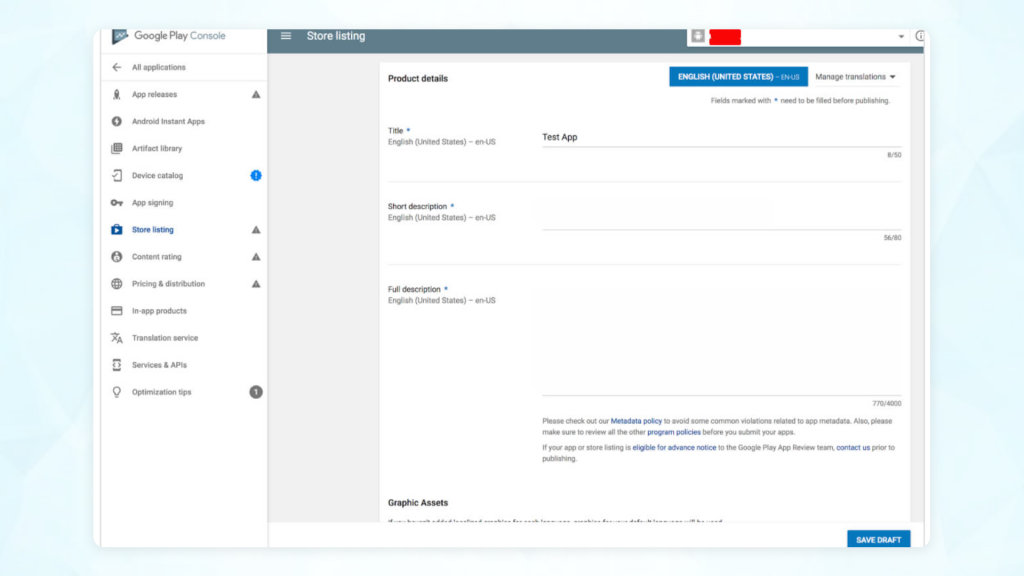
Here, you will need to add the details about your application. You will be getting a box titled ‘Short description’ where you will be able to add the app details along with the appropriate keywords to better the chances of app discoverability in the app store listing.
5. Prepare play store listing
Once you have set your app release type, the next crucial stage is to prepare your app store listing. At this step, you will need to involve a designer, or copywriter before the app is made live.
Here are the things to look into –
- Product Description – It consists of app title (50 symbols), short description (80 symbols), and a full description (4000 symbols) with all the right set of keywords.
- Google play store app screenshots – Play Store enables you to add 2-8 screenshots, so choose the ones which best show the app features and its benefits. The details of the image should be: JPEG or 24-bit PNG (no alpha), from 320px to 3840 px.
- Icon – The requirements are 512px by 512px, 32-bit PNG (with alpha), and Maximum file size: 1024 KB.
- Feature image – The requirements are: JPEG or 24-bit PNG (no alpha), 1024px x 500px
- Tags – Choose the application type from the list present in the store. This will make it easy for the users to find your application.
- Localization – If you have built your app to have multiple languages, mention them and then add translations of the app details in the play store listing. It is recommended to have localized images in the screenshots as well.
- Contact details – In this section, you must add in details about your business contact – website URL, phone, and email address.
- Privacy policy – Google makes it mandatory for you to link your privacy policy page in the Google app store listing.
6. Content rating
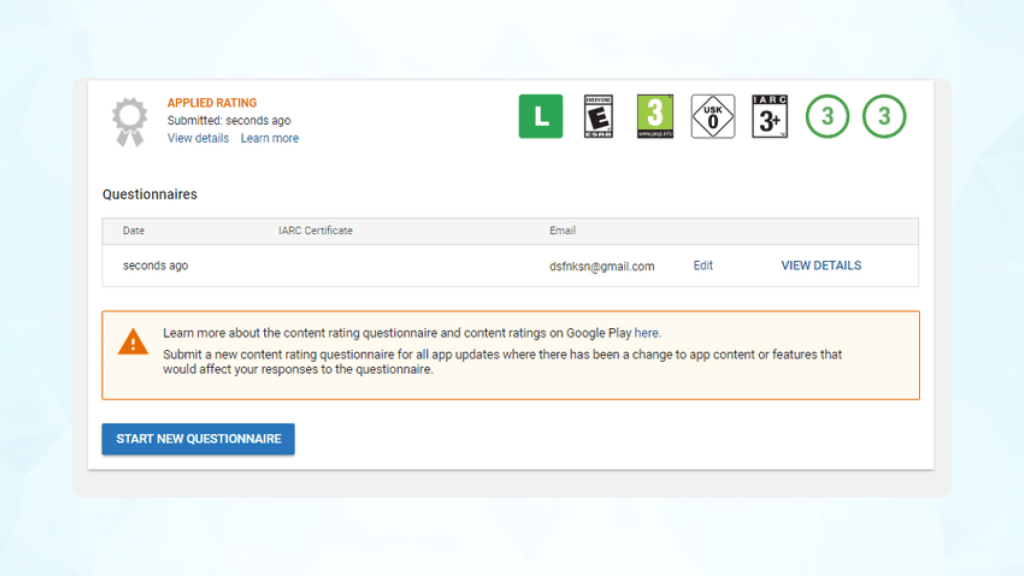
Google makes it necessary for you to have a rating in the application otherwise it would lead to app removal. For this, you will need to pass a questionnaire, which you will find in the left-side menu.
7. Pricing and distribution of the app
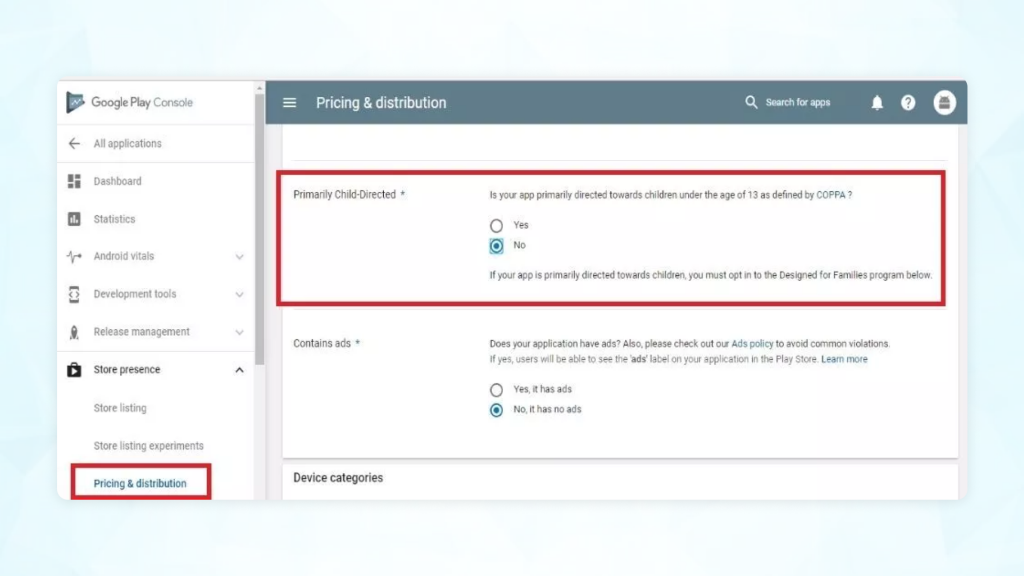
In this section, you will need to add in the details like –
- Your app is paid or free
- The location where the app will be available
- If your app will only be available on specific devices
- If the app contains sensitive content
- If your app will have ads
8. Build and upload the app release
For this stage, you will be needing the app files such as APK, app bundles, and the app release to send for google play app approval. For this, you would need to choose Release Management > App Release.

Here you will get four options under the type of release.
- Internal Test: Releases are made available for 100 testers whom you pick.
- Close Test: Releases are made available to a specific number of testers you pick, who will test the version and then submit feedback.
- Production Release: Releases are made available to the play store users in the chosen countries.
- Open Test: Releases are rolled out to testers on google play, where the users get permission to join the tests from your listing.
Once you have selected the best release type, select ‘Create Release’. Next, select ‘Browse Files‘ and follow the on-screen steps to name and describe your release. Before you confirm, select ‘Review.’ In the end, click on the ‘Save‘ button.
Now that we have dived into the stages of how to make an app for google play, let’s get down to the last critical thing that will define your app’s success.
Have a look – How to get App on App Store: Complete Guidelines
What to do after app submission?
If you were thinking that your work is now done, you are sadly mistaken. The actual work of making your app a success starts now. Let us look into the hows.
Promote your application
Once your app is made live on the play store, start with its promotion through social media, word of mouth, website, and traditional marketing approaches like emails, advertisements, etc.
Initiate press release
Connect with media agencies and press release firms to promote your app store’s live status across relevant media channels.
Think of app maintenance
Once you have published your application, keep track of how people are engaging with it in the comments section or in the media. Following this, work on the app maintenance and constant updates.
Use app store optimization techniques
App store optimization focuses on techniques around keyword addition, correct image dimensions, and accurate content structure. This would help you become more discoverable on the app store listing.
Conclusion
Building an Android application is only the first stage of the development process. The actual work begins when the application is made live on the play store. The stages of making google play uploads can be daunting and to help with it, you would require the help of Android app developers.
At Ailoitte, we make uploading apps in the play store a part of the mobile app development process contract – meaning you won’t have to take any effort in publishing the app on your end. Get in touch with us today to initiate your Android app project and become your industry’s leader.
FAQs around publishing an App to Google Play Store
Yes. You will only need to add a one-time fee of $25 to make a Google developer account, following which, you will be able to publish the app for free.
Yes. It requires minimal technical knowledge to upload the app on the play store.
It depends on you. If you have all the required documents, you will be able to send the app for publishing in one day.
The review process of an Android application can be anywhere between 24 to 48 hours.
Share this article:
Leave a Reply


100+
Project Launched

80+
Happy Clients

18+
Countries Served

91%
Returning client base
.png)
.png)
.png)


Leave a Comment