


Unlocking the gateway to the App Store is like embarking on a thrilling journey where you wield the power to shape your digital masterpiece, captivate audiences, and redefine innovation.
Navigating the complexities of submitting an app isn’t just a process; it’s your ticket to commanding the spotlight, sculpting improvements, and orchestrating the symphony of updates.
The Apple App Store, a digital realm where creativity meets commerce, beckons to those eager to showcase their technological marvels to a community that craves innovation and willingly invests in the enchanting digital experiences you craft.
Dive into the App Store not just for the tech-savvy audience, but for the treasure trove of success waiting for your brand! Business of Apps spills the beans—65% of app revenue flows through the Apple App Store.
Your live app isn’t just a product; it’s a golden ticket to unlock thrilling opportunities and elevate your brand to new heights in the digital realm!
Steps to Get an App on the App Store
This isn’t just about publishing an app; it’s a roadmap to elevate your creation into the desired realms of the Apple App Store.
Jump on a journey to App Store stardom! Unravel the secrets and follow each step laid out below.
Boost your approval odds and set the stage for your app’s triumphant debut!
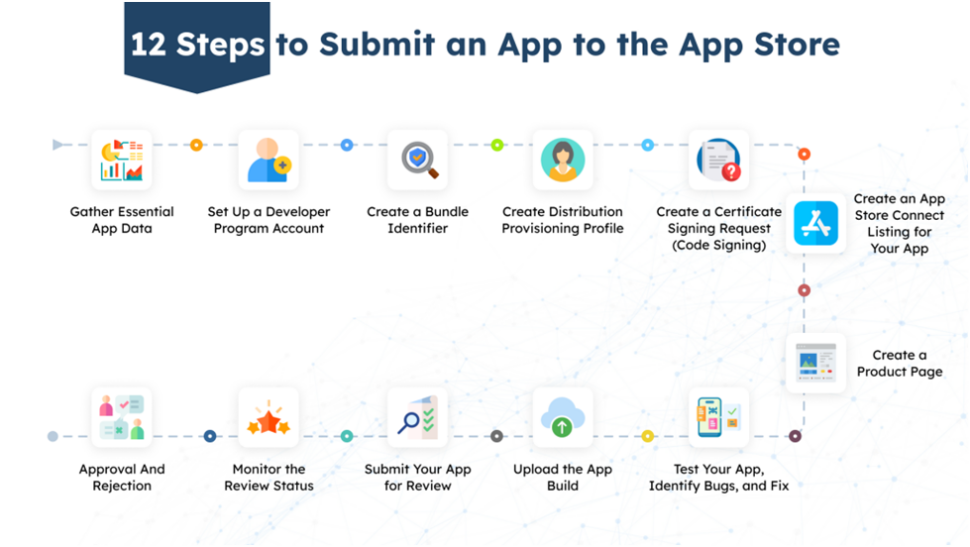
Gather Essential App Data
The primary step of how to upload an app to the App Store is making note of all the information required to start the app submission process on the store, such as –
- Screenshots
Create eye-catching screenshots of your app’s key feature on all supported devices. If your app speaks multiple languages, highlight this advantage in the screenshots for extra appeal. - App Name & Icon
Choose an attention-grabbing name for your app to feature on the app store, and tailor your app icon for various iOS devices in either JPG or PNG format. - Descriptions
Now, let’s dive into the soul of your app – the description! Unleash the magic by revealing what your app is all about, its offerings, and how it caters to user needs. Think of it as your app’s captivating elevator pitch. But here’s the catch – you’ve got a mere 45 characters to make it pop, so let the brevity be your creative companion! - Keywords
Collect all the keywords related to your app’s products/services before publishing on iOS. Add some trendy ones for a more impactful presence. - Support URL
App buyers can find the support URL. This link takes them to the contact details of the app owner or manager, who they can reach out to for any app issues, feedback, or update suggestions. - Privacy Policy URL
To release iOS apps on the Apple Store, having a privacy policy URL is a must. This link directs users to your app’s privacy policy agreement. - Category
Choose one or more categories for your app on the Apple App Store, such as Business, Navigation, Education, or Finance. - Demo Account
Generate a demo account with full access if your app requires log-in features. You can remove it after the completion of the app store review process. - Required Programs
To submit your app on Mac, you’ll need specific OS X programs. The person handling app store submissions should obtain, set up, and use these programs for the submission process. - Apple Developer Program Account
You need a secure iOS developer account to create and submit an app with advanced features that work globally. - Bundle ID
The Bundle ID is a unique identifier that represents your app in the Apple ecosystem. - Xcode
To launch an iOS app, make sure to get the newest Xcode version on your OS X device. - Testflight
TestFlight is a tool that accelerates the testing of your new app build or updates, facilitating client approval, team feedback, and enhancements.
Set Up a Developer Program Account
To apply to the App Store, join the Apple Developer Program, which costs $99 per year. Click here to start now and discover how to upload your app with the tools and guidance provided by the program.
App Developer Program includes:
- App Development/Distribution Tools and Resources
- Comprehensive Solutions for Advanced Features
- App Testing Tools
- Access to Apple Beta Software Program
- Technical Support
- Analytics Tools for the App
Create a Bundle Identifier
The bundle identifier is the unique representation of your app through its name and is displayed on the app store/iOS devices.
Follow these steps to create a bundle identifier:
- Go to Apple’s developer portal.
- Log in.
- Click on Certificates, Identifiers & Profiles Certificates.
- Then click on Identifiers.
- Click on the + sign with a blue background beside the Identifiers.
- Click on App Group and then on “Continue”.
- Create a Description and Identifier for the app.
- For example, if your domain name is AIToday and your app name is FinTech, the identifier should be group.com.aitoday.fintech.onesignal.
- Click on “Continue” after creating the description and identifier.
- Then repeat the 3rd, 4th, and 5th steps.
- Click on “App IDs’’ this time and Continue.
- Select the type App and Continue.
- Fill in the app “Description” section.
- Choose “Explicit” and create the bundle ID in the Bundle ID section.
- For example, if your domain name is AIToday and your app name is FinTech, the bundle ID should be com.aitoday.fintech.
- Scroll down to see the section with small boxes you will have to tick on if they are required.
- In this instance, you can click on App Groups, Associated Domains, Push Notifications, Sign in With Apple, and Continue.
- Then click on “Register”.
Create a Distribution Provisioning Profile
To distribute your app to beta testers or users through the App Store, you need a distribution provisioning profile. Streamline this process by utilizing Xcode.
Here‘s a detailed guide for your convenience:
- Add your developer program account to Xcode.
- Select Xcode from the top and then click on Preferences.
- Click on Accounts, + sign, and Add Apple ID consecutively.
- Use the same Apple ID and password as for the Apple Developer Program.
- Click Sign In.
- Enable automatic signing.
- Pick a target from the Project Editor and click on General.
- Scroll down to the Signing section and click on the triangle icon.
- Click on the box Automatically manage to sign.
- Choose your team.
Create a Certificate Signing Request (Code Signing)
By using a certificate issued by Apple for code signing, you reassure users that your app originates from a recognized and reliable source.
- Open KeyChain Access.
- Click on Certificate Assistant in the top left menu.
- Click on Request a Certificate From a Certificate Authority.
- Enter the email address and the app name.
- Select Saved to Disk, and click on Continue.
- Save the Certificate Signing Request.
Create an App Store Connect Listing for Your App
Before uploading your product, it’s crucial to grasp what App Store Connect is and how it operates. It’s a versatile tool for tasks like app management, distribution, testing, legal agreements, and financial report checks.
Here you can learn how to create the listing according to App Store listing guidelines:
- Log in to App Store Connect.
- Click on My Apps from the App Store Connect Dashboard.
- Click the “+” sign in the top left corner and select New App.
- Choose the app platform.
- Add other required App information like app name, platform, primary language, user access, and bundle ID.
- Then click on Create.
- Click on App Information from the left panel. Add the required information and determine app content and age rating.
- Then click on Pricing and Availability to add the pricing for your app, free trials, and when and where it will be available to customers.
- Add the Privacy Policy URL.
- Click on Prepare for Submission and scroll through the Version Release section to determine the app release strategy after the app certification process.
Steps to Follow For Paid Applications
Submitting a paid app will require you to sign a contract that defines the payment terms of your app.
- Begin by clicking on Agreements, Tax, and Banking on the App Store Connect dashboard.
- Under Request Contracts, click on Request.
- Carefully read and review the agreement and check the box to agree with the terms.
- Click on “Submit”.
- Open the Contact Info Column under the Contracts in Process section, and click on Set Up.
- Then click on Add New Contact to fill in your information.
- Click Set Up and Add Bank Account under Contracts In Process in the Bank Info column.
- Click on Set Up in the column of Tax Info to fill in the mandatory U.S. Tax Form. Choose and fill in other countries’ tax forms as per your requirements.
- After you finish, the contract status will be ‘Processing.’ It will appear under ‘Contracts in Effect’ within an hour once Apple verifies your information.
Create a Product Page
The product page should have clear and concise details about your app, highlighting its unique features and reasons for users to download and use it.
The three sections on the Product Page are iOS App, General, and In-App Purchases.
- Version information
Include details about the current version in the ‘About’ section and confirm if it’s a new version or an update. - App Store screenshots
You can upload up to ten screenshots to represent the USPs of your app. - App Preview Video
Enhance your app presentation by adding a brief video to showcase functionality, UI/UX, and achievements. Extend your reach further by incorporating a multilingual app preview video. - App Description
This part should contain essential details for customers to understand why they need and can benefit from your app. - Keywords
Choose a mixture of relevant and trendy keywords to make it easier for customers to find your app. - Support URL
The supported URL is to provide users assistance directly from you. It is also mandatory for iPhone apps with a website for the same products/services offered on the app. - Marketing URL
The URL where consumers may obtain marketing information about the app. - App Age Rating
You will have to provide answers to Apple about adult content like nudity or violence in your app. Then Apple will determine the appropriate age group rating for your app. - Copyright
Add a company or individual that currently owns the copyrights to the app. - App Location
This part lists the places where your app can be used. For instance, if you’re making a food delivery app, choose the regions where customers can order and receive their food.
You will have to complete sections like App Clip, iMessage App, and Apple Watch only if your app includes these functionalities. - Information for App Review
For the review process of a new app or an update, provide all necessary information, including contact details and access for Apple. - App Release Options
Determine how and when you will release the app on the iOS app store- Manual: Go to the App Store Connect and Release.
- Immediate: The app will be released quickly after app store approval and certification by Apple.
- Fixed Date: You can provide a specific date on which you wish to publish the app if it passes certification.
- Manual: Go to the App Store Connect and Release.
- Pricing and Availability
This page should have the price details for customers to access and use your app. Include information about the app’s availability in one or more countries/regions. - App Privacy
Offer a URL to your app’s privacy policy page for users to review and customize according to their needs. - In-app Purchases
This part should cover details about in-app purchases, such as access to advanced features or a premium account with multiple benefits, like an ad-free experience.
Features available through In-App Purchases:- Consumable.
- Non-Consumable.
- Auto‑Renewable Subscriptions.
- Non‑Renewing Subscriptions.
Test Your App, Identify Bugs, and Fix
Make testing your app a priority – tools like TestFlight can assist in identifying bugs in different settings. A well-organized testing process allows your team to enhance the app, ensuring the final version is top-notch.
For the long term, address minor bugs through updates and keep the Apple review team informed about each improvement.
Upload the App Build
The newest Apple App Store submission mandate mandates the utilization of Xcode for all submissions of iOS, iPadOS, and watchOS apps. Xcode includes SDKs for iOS 15, iPadOS 15, and watchOS 8.
You can follow the steps mentioned below to upload the app build using Xcode:
- You must upload the app build using Xcode to submit it for review.
- Choose Generic iOS Device for deployment in Xcode.
- Select Product from the top and click on the Archive option.
- Select your app build once the Xcode organizer launches.
- Click on Upload to App Store.
- Select your credentials.
- Click on Choose.
- Then click on Upload.
Submit Your App for Review
Double-check that each step is executed accurately and review every small detail to confirm that the app you submit for review includes all the necessary elements.
- Find the Build section in your app’s App Store Connect record.
- Choose the Build you uploaded using Xcode.
- You will then have to answer Advertising identifier questions, Export Compliance, and Content Rights.
- Once done, click on the “Submit” button.
- Then the app’s status will be Waiting For Review.
- Remember to meet all the requirements stated by the App Store guidelines to increase your chances of approval.
Monitor the Review Status
As per Apple, approximately 90% of app submissions undergo review within an average of 24 hours. Each app, with its unique products, services, functionality, and UI/UX, undergoes a tailored review process by Apple to assess its eligibility for the app store.
For more intricate apps, the review duration may extend from 24 hours to 3 days or even several weeks.
If you need to launch your app on a specific date, you have the option to request an accelerated review process.
Approval and Rejection
You can check the approval or rejection of your app in your App Store Connect. Apple will also notify you with an email.
- Approved
After approval and launch, your app will be discoverable on the app store. You can begin monitoring downloads, ratings, reviews, analytics, payments, and in-app purchases in App Store Connect a few days following the launch. - Rejected
App rejection may happen due to issues like bugs, incomplete apps, poor functionality, broken links, or inaccurate information. Visit the Resolution Center in App Store Connect for clarification on rejection reasons. Apple also offers an appeal process if you believe the rejection reasons are unjust.
App performance testing, user feedback, and improvements help prevent rejection.
Recommended Section: How to Reduce The Cost of Mobile App Development
Benefits of Having Your App on the Apple App Store
The Apple App Store boasts a globally trusted reputation, delivering apps that align with rigorous standards of security and privacy set by Apple. As a testament to its impact, the store housed a staggering 3.593 million non-game apps by June 2021.
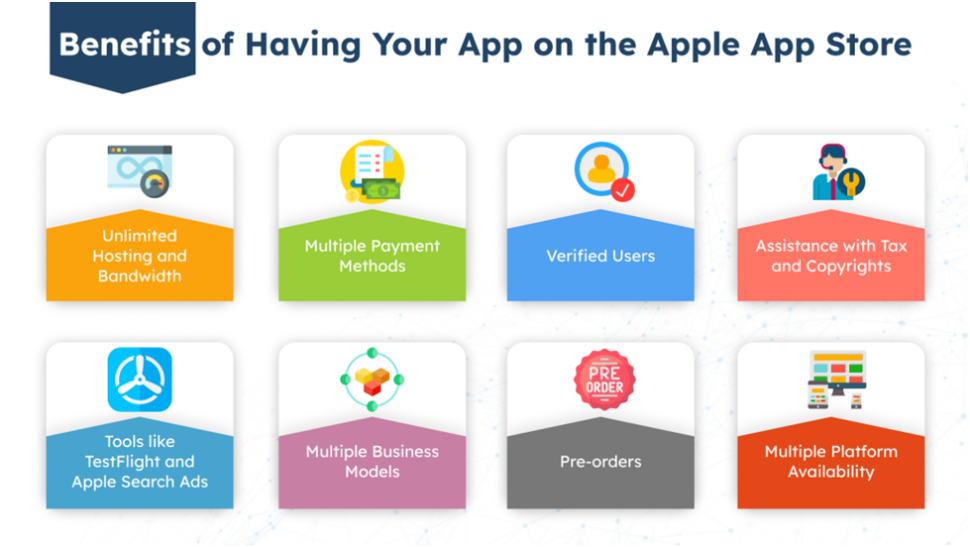
Unlimited Hosting and Bandwidth
The Apple App Store provides hosting and bandwidth for all apps, including updates, bug fixes, and in-app purchases, whether the apps are free or paid.
Multiple Payment Methods
Customers can use credit/debit cards, digital wallets such as PayPal or Stripe, and iTunes gift cards for payments on the App Store. Payment amounts may differ across regions, providing flexibility and helping your app reach a global audience.
Verified Users
Apple enforces a rigorous verification process to confirm the authenticity of each user and guarantee payment for paid apps.
Assistance with Tax and Copyrights
The Apple App Store helps with taxes in 60+ regions and safeguards your app copyrights.
Tools like Test Flight and Apple Search Ads
Enrolling in the Apple Developer Program provides tools like TestFlight and Apple Search Ads. TestFlight aids in testing app build to ensure optimal performance before submission, simplifying the process for iPhone developers. Apple Search Ads enhances app visibility by placing it at the top of search results.
Multiple Revenue Models
The app stores support eight revenue models for different types. These models include:
- Free
- Free with Ads
- Free with Physical Goods and Services
- Free with In-app Purchases
- Free with Subscription
- Paid
- Reader
- Cross-platform
Pre-orders
Evaluating the initial impact of your paid app or the success of your launch marketing is simplified with the pre-order feature on the app store. Users can pre-order and have the app automatically downloaded to their device upon release.
Multiple Platform Availability
Make your app compatible with various devices like Apple Watch, Apple TV, iOS, iPad, and Mac during the submission to the app store. Supporting multiple devices translates to more users, increased usage, and higher revenue.
Also check – Latest Innovative Mobile App Design Trends
Final Note
Launching your app on the Apple App Store is a breeze, but elevating your approval chances requires a touch of dedication. Enter Ailoitte, where our experts not only guide you through the intricacies of iOS app creation but also craft masterpieces that stand out and grab the spotlight on the store.
It’s not just about making an app; it’s about making an app that steals the show!
We’ve got your back from start to finish in the time-consuming app store submission process. At Ailoitte, our iOS developers are always on top of the latest trends and requirements in the Apple development program. If you’re in the early planning stages of your app project, ask for a consultation to determine if Ailoitte is the perfect partner to help you achieve your goals.
Contact Us today!
Frequently Asked Questions
You need a team of developers to create an app and test it to make sure it can perform well and get approved on the app store. Contact Ailoitte for further details.
The Apple app review process usually takes 24 hours, but it can increase from days to weeks for different types of apps. The approval depends on your app functionality, UI/UX, data authenticity, and overall performance.
Join the Apple Developer Program to submit your app to the Apple store. The program subscription costs 99 USD per year.
Exceptional app functionality, UI/UX, data authenticity, and performance factors of app store listing optimization will ensure quick approval from Apple. Factors like bugs, unfinished apps, poor functionality, broken hyperlinks, and false or misleading information will lead to rejection.
Yes, Apple will reject your app if it does not meet the standards and requirements of the App Store. You can read the App Store Review Guidelines to avoid rejection.
Common reasons for app rejections on Apple are bugs, unfinished apps, poor functionality, broken hyperlinks, and false or misleading information.

Share this article:
Leave a Reply


100+
Project Launched

80+
Happy Clients

18+
Countries Served

91%
Returning client base
.png)
.png)
.png)


Leave a Comment